- Posted Dec. 3, 2013, 9:24 a.m. - 11 years, 6 months ago
How to Rotate Parts of a PDF in Infix
In Infix PDF Editor, we can rotate a variety of different objects on the page. We can even rotate entire pages – or the entire document (when we want it to be displayed in landscape or portrait mode).
Infix PDF Editor allows us to create interesting and unusual layouts when we rotate individual objects like text boxes or images. In this document, we’ll look at a few of our options for rotating PDFs and individual selections within them.
Rotating PDF Pages and Rotating a PDF Document
Whilst you can rotate the entire document in the printer properties dialog box, this rotation only affects the current print job. It’s applied when the PDF is actually sent to the printer. This is no use if you want to rotate pages in the PDF permanently.
Instead, you can use the Rotate option in Infix PDF Editor. This rotation is saved with the document, so it’ll take effect on screen as well as on your printouts. You can apply it to several or all pages.
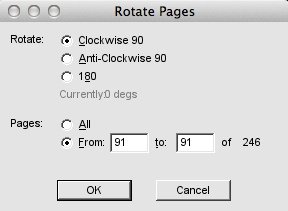
To rotate pages in the PDF, first click Document > Pages > Rotate to open the dialog box. (The options here will control the overall layout – please see the next screenshot to see this in action). In the dialog, select whether to rotate the pages 90 degrees clockwise or anti clockwise, or rotate a full 180 degrees.
Finally, select whether to rotate all pages in the PDF or just a range of pages. Click OK.

If you need to rotate groups of pages throughout the document, just repeat the process for each range.
Rotating Objects On the Page
Practically any object in a PDF can be rotated when editing the file in Infix PDF Editor, including text and images, and items in the header or footer. This feature is especially useful when creating interesting posters or flyers, or you can use it to correct items that are not in the correct orientation to start with.
To rotate an object, select the Object tool and click on the text or image. Next, click Object > Rotate. This will display the Rotate dialog box. In this dialog, set the degree of rotation.
Alternatively, click the Rotate button in the toolbar and you can manually rotate the object on the page.
Aboout the Centre of Rotation
You can adjust the centre of rotation for any object you want to rotate. This controls how the rotation will take effect.
To set this, select the object and click the Rotate button in the same way you would to manually rotate the object. But before you manually rotate it, click the point you want to rotate the object around. This will place crosshairs on the new centre of rotation (you can adjust this position by clicking at another point). When you are happy with the new centre of rotation, manual rotation will spin the object around this central point. The next screenshot shows an example of how this is done; notice the crosshairs at the bottom right corner, and the pale blue line showing the rotation as I drag the mouse pointer.

These basic functions are quick and easy to use, and the centre of rotation option is very powerful. With a little creativity, you can correct PDF errors, adapt your pages to the content and spice up your layouts with interesting positioning of objects
Latest Articles
-
Our latest testimonial for Infix 6
Dec. 19, 2016, 2:40 p.m. -
Most commonly translated Turkish words
Feb. 6, 2015, 9 a.m. -
Merry Christmas & A Happy New Year
Dec. 25, 2016, 8 a.m. -
New Save PDF to SVG feature introduced to Spire.Office
Dec. 23, 2016, 11:54 a.m. -
Editing educational PDFs – a user perspective
July 21, 2014, 8:03 a.m.
Categories
Iceni Technology Ltd.,
36 St. Faiths Lane,
Norwich, England, NR1 1NN