- Posted July 16, 2013, 3:11 p.m. - 11 years, 11 months ago
How to Rubber Stamp a PDF Document in Infix
When you need to quickly annotate a PDF document or add eye-catching comments, stamps are a versatile solution that offer a little more than simple comments.
In this article, we’ll take a look at the stamp feature in both Infix Standard and Infix Pro.
What Are Stamps?
In Infix PDF Editor, stamps are graphics that can be placed anywhere on a document. They’re the virtual equivalent of a rubber stamp, but they can be used in a variety of ways.
- Alongside each stamp, you can add a comment that will be displayed in a pop-up window. This helps to draw the eye, and the pop-up allows you to provide an explanation of the stamp without cluttering the page.
- Stamps can be resized to suit the flow and purpose of the document.
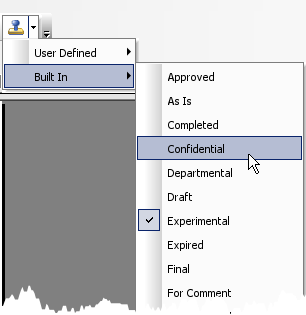
- You can also vary the stamp appearance. Infix comes with a range of pre-defined stamp symbols that you may find useful: Sold, Void, Approved etc.
- You can add your own stamp symbols and share these among your workmates or friends.
By default, the Stamp tool is hidden. You’ll need to reveal the commenting toolbar to show it. To do this, click View->Toolbars and tick Commenting. (Note: the toolbar may appear at the bottom of the Infix window.)
Click the drop-down arrow and explore the various options.

- To insert a stamp, select a type and then click once on your document to insert the stamp at the regular size. Alternatively, click and drag a box, the stamp will be added at the size you define.
- To create a pop-up box alongside your stamp, double click on the stamp.
- To make it transparent, right click and alter its Properties.
Designing Custom Stamps
Infix can use your own stamp designs as well. You may want to create stamps to support your workflow with different wording than the ones we’ve supplied. You could also create a stamp for your company logo or perhaps a stamp with your address on.
You can define your own stamps in the registered and demo versions of the Infix application.
In order to create a new stamp, just create a new PDF in Infix or use a PDF you’ve acquired from another application. Build your stamp use Infix’s Drawing tools. Reveal them by clicking View->Toolbars and ticking Drawing. (Note: the toolbar may appear at the bottom of the Infix window.)

Using Custom Stamps
One your stamp has been created, you just need to tell Infix where it’s stored.
In the menu under the stamp tool in our first screenshot, you’ll notice there was a User Defined menu option. Here, you can set the folder where your stamps are located. This can be a local folder or a folder on your network. (If you use Infix at work, you might want to use a network drive so that your colleagues can access and use the stamps you create.)
When you add the folder for the first time, Infix scans it and lists your stamps by file name under User Defined. After this point, if you add a new stamp, you will have to close and re-open Infix before it’s displayed.
Latest Articles
-
Our latest testimonial for Infix 6
Dec. 19, 2016, 2:40 p.m. -
Most commonly translated Turkish words
Feb. 6, 2015, 9 a.m. -
Merry Christmas & A Happy New Year
Dec. 25, 2016, 8 a.m. -
New Save PDF to SVG feature introduced to Spire.Office
Dec. 23, 2016, 11:54 a.m. -
Editing educational PDFs – a user perspective
July 21, 2014, 8:03 a.m.
Categories
Iceni Technology Ltd.,
36 St. Faiths Lane,
Norwich, England, NR1 1NN